
How to share confidential documents using Dropbox and Espionage for Mac
I have a MacBook Air, and my wife has an iMac. The challenge is to have shared access to our family's documents, while securing those which are confidential. This article describes our solution.
Dropbox solved the first challenge—providing shared access to our documents. But without a solution to the second, our confidential documents remained potentially exposed to anyone who stole (or got access to) our computers, or anyone who got access to our Dropbox account.
Recently, I discovered a solution to the security problem—an app for Mac OS X called Espionage. I introduced Espionage in a previous article here on the blog. In today's article, we'll look at how to use Espionage with Dropbox.
Overview
From my previous article, you'll recall that Espionage provides access to sets of folders whose contents are encrypted. It does this by storing each folder's contents in encrypted disk images, and then mounting those disk images, on your command, at their original folder locations in the Finder. It's similar in function to products like Knox, but providing a far more convenient user experience.
Because Espionage uses sparse disk images, it becomes feasible to store those images in Dropbox (instead of Espionage's default location in its Application Support folder), since small changes in content won't result in having to re-upload the entire image. And that in turns opens the door to sharing of confidential documents between multiple computers running Espionage.
Clearly, to avoid Dropbox conflicts and potentially corrupting the disk images, only one computer at a time can access any given folder. I'll also describe how we address that risk.
Ok, let's dig into the details.
The Detailed Process
Setting up shared access to the secured documents involves establishing the setup on one computer first, moving the relevant Espionage disk images into Dropbox, and then reversing the setup on the second computer.
On each computer's hard drive, there will be two relevant locations:
- Where the Espionage encrypted images containing your confidential documents will be stored.
- Where your confidential documents will be accessed.
The first location—where the encrypted images are stored—will be Dropbox.
The second location—where you will access the confidential documents stored in those disk images—will not be Dropbox. This avoids redundant syncing and having your confidential documents stored unencrypted at any time in Dropbox.
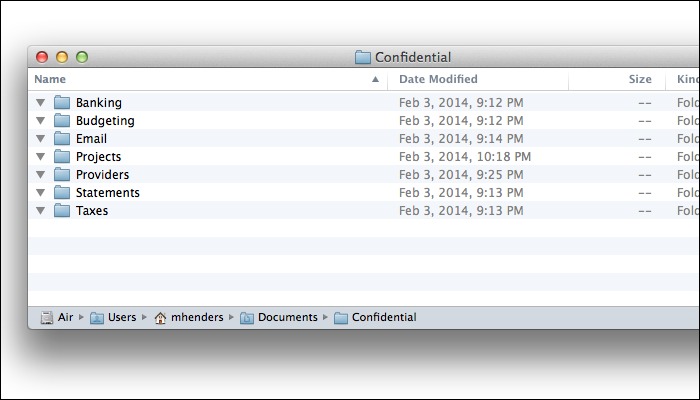
Step 1: On each of our computers, I've created a folder called "Confidential" at the root level of our user accounts. Here's what that folder looks like on my MacBook Air, before I've imported them into Espionage, and before I've added any confidential documents.
Step 2: Starting with the MacBook Air first, I dragged all these empty folders into a new folder set in Espionage:

For each folder, Espionage internally creates an encrypted sparse disk image (to hold the folder's contents), protected with a random password derived from your folder set's master password. That disk image is physically located in the Espionage "Application Support" folder, in your "Library" folder.
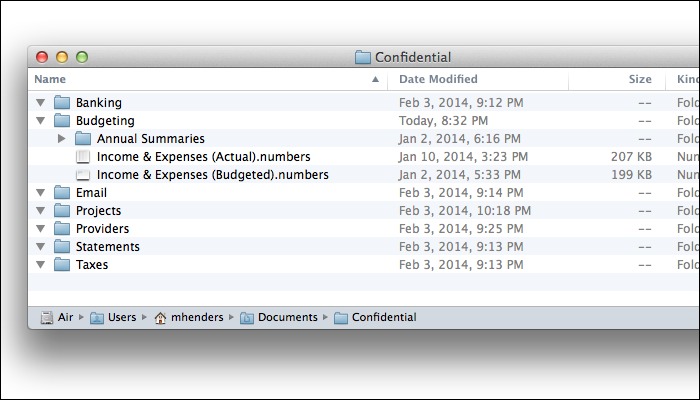
Step 3: I then unlocked each folder in Espionage, and (in the Finder) copied in our confidential documents. Here's what that looked like, after having copied in the contents of our "Budgeting" folder:
Step 4: Having copied in all our confidential documents, I then told Espionage to lock all the folders. Once Espionage unmounted all the source images, the folders in "Confidential" again appeared empty:
You can actually combine steps 3 and 4, by dragging folders that already contain your confidential documents into Espionage. In fact, it's even preferable to do that, since it helps Espionage calculate the size of the disk image. Note, however, that after Espionage imports your folders, it'll throw the original away in the trash. Until you empty the trash, you'll still have an unprotected copy of your documents on your computer!
Also remember, all this mounting and unmounting of disk images happens behind the scenes in Espionage. To the user, it just looks as if his secured documents are appearing and disappearing from those secured folders, as they are unlocked and then locked again in Espionage.
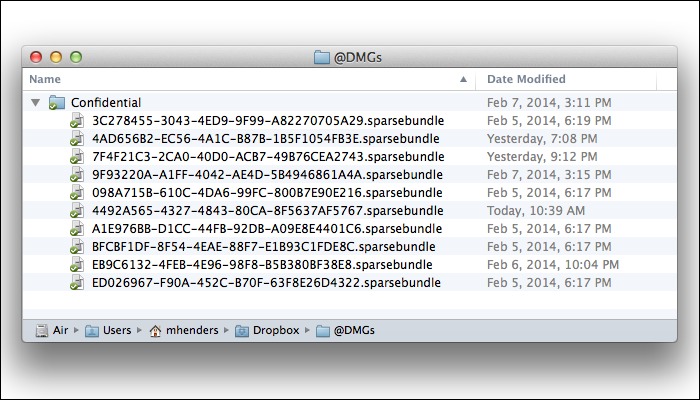
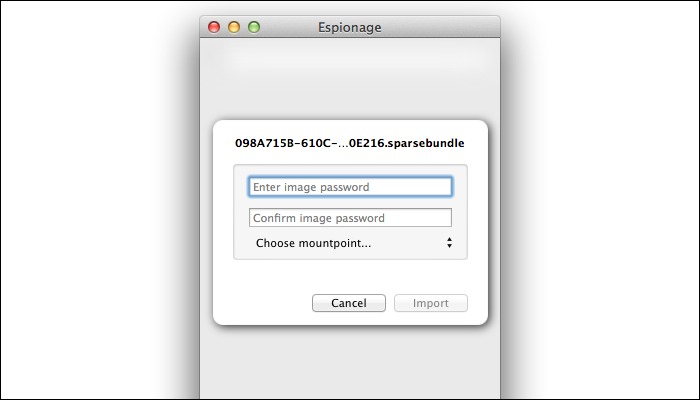
Step 5: Now, for each of these secured folders, I clicked on the info button in Espionage, and relocated the source disk image from its original location in "Application Support" to a folder in Dropbox. In this screenshot, you can see that I've already relocated this one:
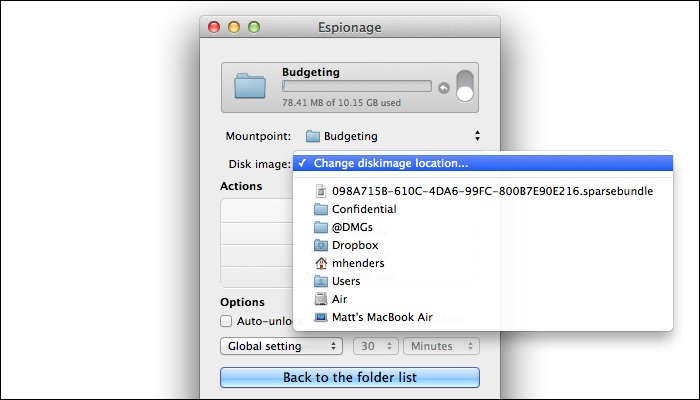
You'll notice that the names of the disk images are random; should anyone ever steal your computer, or get access to your Dropbox account, they wouldn't even know what those images might be associated with. (Unless you've blogged about it, as I've done here. :-)
Step 6: While the folder info window was still open in Espionage, I copied the disk image access password to the clipboard, and then stored it in 1Password. You'll need this in order to import the disk image on the second computer. (Remember, the Espionage disk image passwords are not the same as the password associated with your folder set; rather, Espionage creates a much stronger random password for each individual disk image, that is algorithmically derived from your single folder-set master password.)
Step 7: We're now done with the MacBook Air. Before starting on my wife's iMac setup, I waited for Dropbox to finish syncing all the Espionage encrypted disk images on both computers.
Step 8: To set things up on the iMac, we simply reverse the process. We start by dragging the disk images into a new folder set in Espionage, enter their associated passwords (which, recall, we stored in 1Password), and then associating those disk images to their relevant locations ("mount points", in Espionage-speak) in the "Confidential" folder we created in Step 1.
At this point, we're done. Either computer can now use Espionage to unlock the contents of any of our confidential folders, making them available for use. We've hopefully achieved (relatively) secured sharing of confidential documents.
Avoiding Conflicts
A problem could arise if both computers tried to access a given folder at the same time, or tried to access a folder whose source disk image had not finished synchronizing. And that problem could manifest itself as an inaccessible, corrupt disk image.
This risk of this happening increases with the frequency with which both sides need access to the confidential documents. Fortunately, in our case, neither my nor I work with our confidential documents on a daily basis, and we tend to work in different areas of our confidential documents—e.g. I do the banking and she does the budgeting.
But still, we need to take precautions.
Backups—First, CrashPlan keeps all our home computers backed up, with at least a year's worth of file versions. Should a disk image get corrupted, we'd be able to recover.
Notifications—Second, in order to help avoid conflicts in the first place, I have Growl 2 running on my wife's iMac, and setup to send all Espionage notifications to me in emails. So if my wife opens our "Projects" folder, I'll get an email. And I'll get another email when she closes it.
With these notifications in place, I should only run into conflicts if I forget to wait until Dropbox syncs the closed disk images.
Concluding Thoughts
For those who didn't read my introduction article to Espionage, here are a few reminders and concluding thoughts:
- Espionage provides customizable settings for each secured folder, and based on your own situation, you may or may not want to adjust those. For my own situation, I have each folder set to auto-lock after about two hours, just in case I open a folder and forget to close it.
- Remember that the master password you choose to unlock a folder set is not the same password that Espionage uses when creating its disk images. Even if you chose a weak, easy-to-remember master password, your disk images are still encrypted with long and complex random passwords.
- It's probably a good idea to store the mapping of those disk image names to their Espionage passwords in something like 1Password, just in case you ever needed to decrypt them without Espionage. (They are standard OS X disk images, after all.)
- Remember that you can manage multiple folder sets in Espionage, each one associated with a different master password. In this article, we've discussed sharing files in a single set of folders, but keep in mind you're not limited to just one.
- Remember that although a sparse disk image appears as a single file in the Finder (e.g. in Dropbox), it's actually a bundle of thousands of little files. As such, they can efficiently be stored in Dropbox, which makes this whole scheme feasible.
That's about all. I hope you've enjoyed this article, and I'll update it with additional thoughts and observations as I have them. And if you have any questions or feedback, don't hesitate to leave a comment or contact me.
Update: Since writing this article, I've since switched to a new approach.
Enjoy this article? — You can find similar content via the category and tag links below.
Categories — Technology
Tags — Apple
Questions or comments? — Feel free to email me using the contact form below, or reach out on Twitter.