
Using Keyboard Maestro to create todos in OmniFocus 2 that are linked to original messages in Mail
About a year ago, I switched from OmniFocus to Things, in part because of a dislike of the OmniFocus Mac app. Today, I’m switching back to OmniFocus for two reasons.1. OmniFocus 2 for the Mac was released yesterday—delivering feature and UI parity with its wonderful iPad cousin. 2. I’ve pretty much given up hope that Things 3 will be released within my lifetime.
Switching from Things to OmniFocus involves a mental shift from “Projects, Areas & Tags” to “Projects, Contexts & Perspectives”—but beyond that, the transition has been pretty smooth. There was, however, one critical workflow problem to be solved—creating todos linked to Mail.app messages.
No auto-linking in Quick Entry
Many, if not most, of the todos I create are related to email messages. In Things, when the “Quick Entry with Auto-Fill” feature is invoked, any messages currently selected in Mail.app gets auto-linked in the newly created todo, as you can see here:
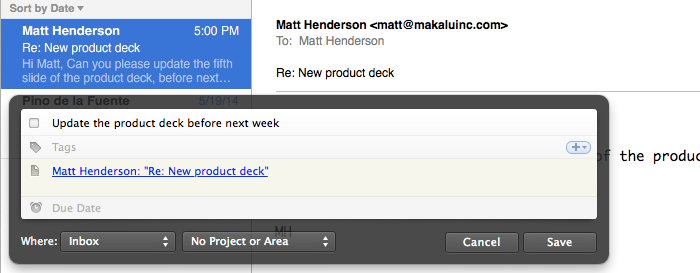
Unfortunately, OmniFocus’s equivalent Quick Entry feature doesn’t provide the capability to automatically link to selected Mail messages.

Being able to quickly get back to the original email message—for replying, or accessing an attachment—is critical for me, and so this missing functionality was nearly a show-stopper.
The OmniFocus “Mail Drop”
In lieu of auto-fill, what OmniFocus does support is something called “Mail Drop”. If you use Omni’s proprietary system to sync your OmniFocus data, you can create a special email drop-box address.
Email messages arriving to that address on Omni’s servers are automatically added as todos in your OmniFocus inbox. Those new todos are named according to the message’s subject, and have their “Note” field pre-populated with the message’s content.
That’s certainly useful—and beyond just creating todos from Mail.app messages—but it doesn’t address the particular need I have to be able to efficiently get back to the original Mail messages from linked todos.
Keyboard Maestro to the rescue
As with so many challenges I’ve faced when working on a Mac, a solution was found using the wonderful Keyboard Maestro macro application.
Using Keyboard Maestro, I was able to create a script that, when executed, creates and sends a custom-built email to my OmniFocus Mail Drop—and containing a direct link back to the original Mail message.
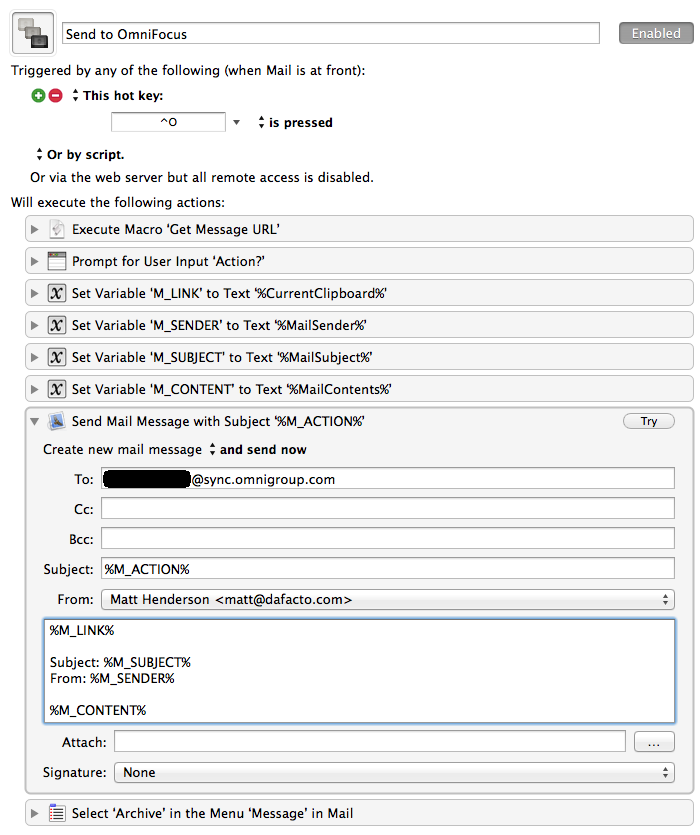
Specifically, here’s what the script does:
- It executes a Keyboard Maestro script called “Get Message URL” which calculates the URL to the currently selected Mail message. (That script simply executes some AppleScript, which I’ve included below.)
- Prompts me for a short text to be used as the todo title.
- Sets a variety of Keyboard Maestro variables.
- Creates an email message whose subject and body content are built from those variables—including the link to the original message—and then sends that email to my Mail Drop address.
- Archives the original Mail message—since at that point, I’m done with it.
Here’s what that Keyboard Maestro script looks like visually:
And finally, here’s the AppleScript used in the “Get Message URL” script:
tell application "Mail"
set _sel to get selection
set _links to
repeat with _msg in _sel
set _messageURL to "message://%3c" & _msg's message id & "%3e"
set end of _links to _messageURL
end repeat
set AppleScript's text item delimiters to return
set the clipboard to (_links as string)
end tell
Back to work
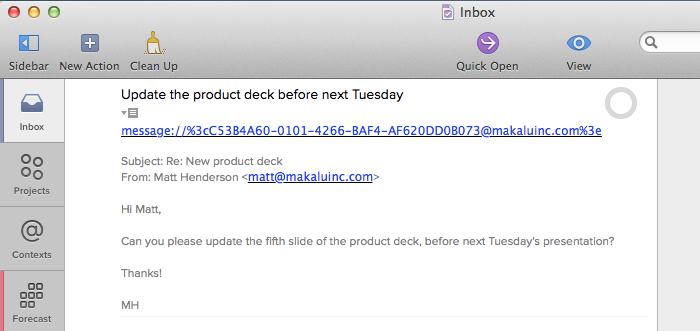
Shortly after the script does it job, a new todo, like the following, will appear in the OmniFocus inbox—containing a custom title, the original message’s subject and contents, and most importantly for me, a clickable direct link back to the original message in Mail.
So there you have it—an elegant solution for creating message-linked todos in OmniFocus 2. I hope you enjoyed this article, and feel free to ask any questions you might have in the comments below.
Update 2014-05-27
If you'd like to achieve the same thing without having to rely on the OmniSync server, I just posted a simpler method here.
Enjoy this article? — You can find similar content via the category and tag links below.
Categories — Technology
Tags — Keyboard-Maestro, Apple
Questions or comments? — Feel free to email me using the contact form below, or reach out on Twitter.