
How to protect your home network with a VPN router
In this article, I describe how I added security to my home network by installing a router that directs all internet traffic through an encrypted VPN connection. The adventure includes my experience with the FlashRouters company, the Tomato router firmware software, an OpenVPN connection to the Cloak network, the Linksys E2500 router and the Netgear Nighthawk R7000 router.
Introduction
In the past, my approach to protecting the internet privacy of the devices on our home network was to run the Cloak VPN software on each device, all tied to the same Cloak account running the ”Unlimited" plan. The downside to this approach was the complication of services running on the local network—such as screen sharing and CrashPlan—as the Cloaked devices were unable to see each other on the LAN while their VPN connections were active.
Since all the home network devices connect to the internet through a router, a better solution would be that the router itself is connected through a VPN service. Unfortunately, though, my ISP's router, nor any commercial replacements I could find, support a VPN client.
Enter Tomato
The solution that I recently learned about, is an open-source project called Tomato, which is a Linux-based firmware replacement for many commercial routers, and which includes a VPN client that allows the router to secure the entire network.
With that discovery, all I needed to do was get my hands on a router running Tomato!
Enter FlashRouter
My first inclination was to buy a compatible router, and then try to install the Tomato software myself. But I was immediately discouraged from taking this route, as the first installation tutorial I ran across looked beyond what I’d be comfortable attempting, requiring use of the Terminal.
But then I learned about a company called FlashRouters who sell routers that are pre-flashed and configured with the Tomato software. Although they obviously would cost a bit more, you’re buying a turn-key solution, which seemed like a much better option!
The problem with ordering from FlashRouters, in my particular case, is that I live in Spain and they are located in the United States. And although they'll happily ship internationally, the total cost of the router would be very expensive once I included shipping costs, and import duties.
I asked on Twitter whether there were any European providers of routers of the likes sold by FlashRouter, and FlashRouter themselves responded that they also offer a $100 Basic Support Plan in which a customer procures their own router, and the FlashRouter staff remotely installs Tomato and configures it.
That sounded like a great option, and the one I’d go with! So now it was time to procure a router.
Enter the Linkysys E2500
When deciding which router to buy, I reviewed the devices sold by FlashRouters, and since the only thing I was interested in was VPN connectivity, I just chose the cheapest—the Linksys E2500—which was available here in Spain on Amazon.es, for 47 Euros.

One the router arrived, I purchased the FlashRouters $100 remote setup service, and received an email with detailed instructions, a download link to the version of Tomato I'd be installing, and a download link to a TeamViewer application that FlashRouter use to login and control my computer while performing the update.
To remotely update a router, the FlashRouters staff ideally want your computer to have both an active internet connection (through which they connect) and an Ethernet port that can be connected to the target router. I was able to provide such an environment with my MacBook Air connected to the Internet via wifi, and then having the Linksys router connected via a USB Ethernet adapter.
Understanding how the TeamViewer app worked was a bit confusing, but I eventually figured out that once it was launched, the people at FlashRouters get notified. After a few moments, a chat window appeared (through which we'd communicate during the session), my desktop turned blue, and the FlashRouter staff took control of the mouse.
I then watched as the FlashRouters staff logged into the Linksys admin software using the Safari browser, and uploaded the Tomato firmware package (that I'd downloaded as per their instructions and put on the Desktop.)
After router rebooted, the FlashRouters staff logged into the router, now running the Tomato software, setup the parameters for the LAN it would create, configured the 2.4 and 5.0 GHz wifi networks, and finally configured and tested the VPN client to connect to one of my two VPN providers.
Before concluding the support session, the FlashRouters staff thoughtfully opened TextEdit, and typed in some reference information I might need.
Afterwards, I found myself thinking that while the FlashRouters staff provide a GREAT customer experience, the whole process of flashing and configuring a router turned out to be much easier than I'd assumed, and didn’t require any use of the Terminal. I thought that if I had to do it again, I could probably do it myself—but only because I'd seen them do it once, and had the opportunity to see how they responded to a couple of things that might have tripped me up.
Speed problems with the E2500
While the FlashRouters staff were testing the updated Linksys router, I ran SpeedTest and was disappointed to see upload and download speeds of 6Mbps, when the throughput provided by my ISP over their fiber connection is a symmetrical 40Mbps. The FlashRouters staff pointed out that VPN encryption will certainly degrade throughput somewhat, and commented that I wouldn't know the true throughput until I installed the router properly on my network.
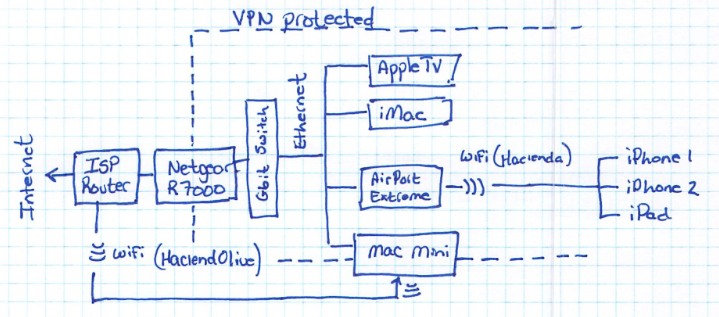
My home network is setup is as follows: My ISP's router is connected to their fiber cable on the WAN side, and connected to my Gigabit switch on the LAN side (i.e. the internal home network). That switch feeds an Ethernet network that runs throughout my house, to which most of our desktop computers and an AppleTV are connected.
I also have an AirPort Extreme connected to the Ethernet, which creates our home wifi network, operating in bridge mode such that the ISP's router is the device handing out DHCP addresses to all devices on the wired and wireless networks. (I can't use the ISP's router for wifi, since it's stored in a cement-enclosed closet where the ISP’s fiber cable terminates.)
To install the Tomato router, I simply placed it between my ISP router, and the Gigabit switch. Easy peesy.
Unfortunately, when I then retested the throughput using SpeedTest, I got the same results—6Mbit upload and download. Drat!
Thinking the problem might be related to the capacity of my VPN provider's servers, I tried running SpeedTest on a Mac running Cloak, and connected directly to the ISP router. (Cloak is a VPN service specific for Mac and iOS devices, that is known for the quality and functionality of its client software.) Through the Cloak VPN, I got the full 40Mbps upload and download, which would seem to eliminate inherent VPN encryption loss as the culprit!
At this point, I'm thinking the problem is with my other VPN provider’s servers, and hoping the solution is getting the Tomato router to connect to Cloak’s network instead.
But Cloak's focus is their client software. Unlike other VPN providers, Cloak's website doesn't provide any instructions for accessing their network from general OpenVPN clients. After some googling though, I ran across a Gist by Cloak founder Dave Peck, in which he provides an unsupported OpenVPN configuration for connecting to their network. Great!
After some fiddling, I was able to configure the Tomato router's second VPN client to connect to Cloak's network. Yeah! (It's quite neat that the router supports two VPN clients. But why you might need that is beyond the scope of this blog article.)
With the Tomato router connected to Cloak's network, I ran SpeedTest again, fully expecting to see 40Mbits of throughput, since that's what I saw on my Mac. But, damn!—once again I was seeing 6Mbits! Grrrrr!
Enter the Netgear Nighthawk R7000
So if it wasn’t an inherent issue with VPN encryption, and if it wasn’t an issue with the VPN provider's servers, I was left thinking, "What on earth is the problem?"
Google to the rescue.
After some Googling, I discovered that the extent to which the handling of the VPN encryption affects throughput is a function of the CPU power of the device. Reading that, my mind flashed back to the moment I thought, "Yeah, I'll just go with the cheapest router." Turns out, the Linksys E2500 is powered by a puny little single-core 300Mhz processor.
My office colleague Arto mentioned that since the Tomato software provides SSH access—it's Linux after all—I could login and run "top" to monitor the CPU level while running SpeedTest. I did that, and sure enough, the CPU was pegged at 100% once SpeedTest reached 6Mbps.
Clearly, the CPU of the Linksys E2500 limits its VPN throughput to about 6Mbps. It's surprising (and unfortunate for me) that a clear statement of that isn't found anywhere.
Since Amazon.es has a great return policy, and I immediately looked for a replacement. Back on the FlashRouter site, I saw that a popular "high end" router is the Netgear Nighthawk R7000, which sports a dual-core 1GHz ARM processor.
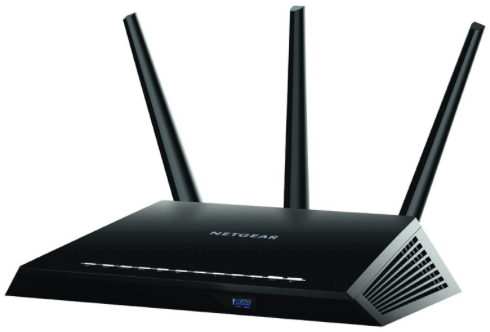
I placed my order, and the stealthy looking thing arrived the next day.
Do-it-yourself Tomato installation
Having watched the staff of FlashRouters update the Linksys router, I felt confident I could update the Netgear device myself, and so began, “The Adventure of Figuring Out What To Download”.
I headed over to the Tomato by Shibby site, clicked “Downloads”, and was shown several download areas one of which—the “K26ARM” area—listed the R7000. Here’s what I found clicking in there.
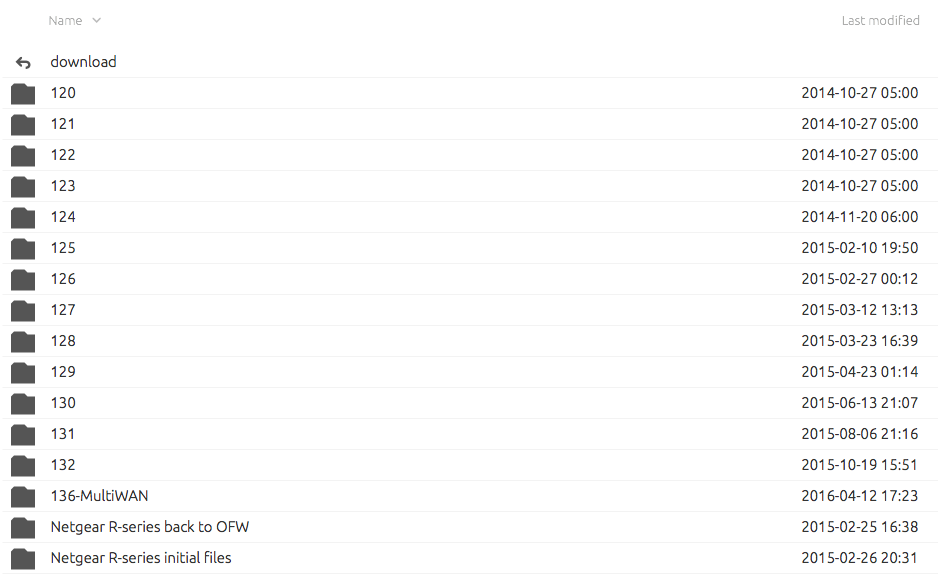
We find version numbers 120 through 132, plus one additional oddly-named, “136-MultiWAN” version. Given that it’s named differently, I find myself unsure whether 136-MultiWAN is the latest version, or whether its some special version? After more Googling, it seems most people are running 136, so let’s roll the dice and grab that one.
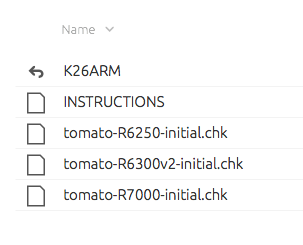
But then clicking into the “136-MultiWAN” folder, we see this.

Hmmm—for each supported router, there are two Tomato files you can download—an “AIO” version, and an “VPN” version. And there’s no README file or anything that might give us a clue as to the difference.
Googling “difference between Tomato AIO and VPN”, I discovered that the AIO package includes lots of Linux apps I wouldn’t need, and that the “VPN” version was a minimal package you might install if you only want VPN functionality. As a minimalist, I downloaded the file:
tomato-R7000-ARM--136-VPN-64K.trxBefore leaving the download area, however, I’m thinking it’d probably be a good idea to understand what that “Netgear R-series initial files” folder is all about.
Looking inside, we find this.
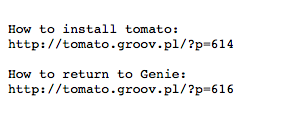
Still no idea what it is, but at least there’s an instructions file! But clicking on that we see this—links to two more pages!
This is starting to feel like scavenger hunt…
Visiting the “How to install Tomato” link, we land on a page with a video in which the Tomato author has recorded himself setting up a Netgear router. The video lasts 12 minutes, as we have to sit through a number of two-minute device restarts.
On the negative side, the quality of the video is so poor you can’t see the file names of the firmware he’s uploading to the device, but on the positive side, the video does communicate that with the Netgear router, we’re going to have to flash it twice, and that is the purpose of the “Initial” file, and so I downloaded:
tomato-R7000-initial.chkWith those two files in hand, here’s the procedure I followed to install Tomato on the Netgear Nighthawk R7000:
- Connect the router to the USB-ethernet adapter connected to my Mac.
- In the “USB-Ethernet” connection the Networks system preferences on my Mac, I manually set the IP address to 192.168.1.2 with subnet mask 255.255.255.0. This was done just to make sure I could ping the router if necessary.
- Using Safari, login to the Netgear interface on address 192.168.1.1, with username and password: admin/password
- Go to Admin → Upgrade, and upload the Tomato “initial” image, tomato-R7000-initial.chk.
- After a few minutes, the router rebooted into the Tomato software, and I logged in with admin/admin.
- Go to Admin → Upgrade and upload the second Tomato image file, tomato-R7000-ARM--136-VPN-64K.trx. IMPORTANT: Check the “Erase NVRAM after update”.
- After a few minutes, the router rebooted into the final version of the Tomato software, ready to setup and configure.
Yeah—I didn’t brick the device!
Configuring Tomato on the Netgear Nighthawk R7000
Here are the things I did to configure the Netgear router:
- I changed the DHCP network managed by the router from 192.168.1.x to 192.168.12.x. See screenshot
- Enabled UPnP. See screenshot
- Enabled SSH access to the router. I pasted in my SSH public key, after which I could “ssh root@192.168.12.1” to get in. See screenshot
- Configured VPN Client 1 to connect to Cloak. I won’t use Cloak as my default connection, but anyway wanted it setup in case I ever needed it. (The “Start with WAN” is the setting that will cause it to auto-start when the router starts, which in this case is disabled.) See Screenshot 1, Screenshot 2 and Screenshot 3. (Remember, this is all from Dave Peck’s Gist.
- Configured my default VPN client, and set it to auto-start. See Screenshot 1, Screenshot 2, and Screenshot 3.
- Configured the 2.4GHz and 5GHz wireless networks (even though I probably won’t use them.) See screenshot
Installing the Netgear R7000 in the network
Once I had the Netgear router configured and successfully connecting to my VPN provider, I put it into operation by installing it between my ISP router and my Gigabit switch.
A downside to having my home network connected to the internet through a VPN that exits the world in some other country is the loss of UPnP services like “Back to my Mac”. As a work-around, I installed Slink on my home Mac mini server. This server is connected to my home network via ethernet to the gigabit switch, and it's connected to the ISP router via wifi.
In the Network settings on this mini, the wifi interface is set as the highest priority, so that internet traffic will enter and exit through that interface. With this setup, when Slink loads on startup, it configures the incoming ports on the ISP router via UPnP to allow incoming connectivity from the internet. When I then securely connect remotely to this machine using the Slink client running on, say, my MacBook Air, Slink will provide tunneled access to all the services it finds running on the LAN side of the Netgear router, including screensharing to all our home computers.
Performance of the Netgear R7000
With everything in place, it was the moment of truth—time to run SpeedTest and confirm whether or not the Netgear R7000 is capable of providing my full available bandwidth through the encrypted VPN:

As you can see, it does! Woohoo! And at max throughput, the CPU level of the R7000 sits at about 50%, so there’s processing room to spare.
Conclusions
Here are some concluding thoughts I noted having completed this adventure of getting my home network secured with a VPN router:
- Given that a VPN service with unlimited data costs less than $50 per year, securing a home network with a VPN router is something that could be interesting for the masses. Unfortunately, getting there remains beyond the do-it-yourself technical expertise of most people, and that’s a shame.
- On the other hand, providers like FlashRouters and Sabai Technology provide turn-key solutions, and that’s great, at least for people in the United States. It’s a pity I couldn’t find a provider in Europe, but the experience of the remote-installation service provided by FlashRouters couldn’t have been better.
- From my experience, the Linksys E2500 clearly doesn’t have the CPU power to process more than about 6Mbps of throughput on an encrypted VPN connection. It’s surprising that’s not stated anywhere. (Well, it will be now!)
- Although I was able to succesfully update the Netgear router myself, I probably would have gotten tripped up in a few places had I not watched the FlashRouters people perform the update on the Linksys router. So even though updating a router is far easier than I first imagined, I’d still recommend going with the FlashRouters service if you can afford it.
- It’s hard to be critical of open source softare authors, when the world owes them tremendous gratitude for the thankless voluntary contributions they’ve made. In so many cases, though, like the Tomato project, the gap to providing to accessibility to such a wider audience could be bridged by simply imagining the needs of a first-time “customer” to the project—e.g. a brief orientational introduction, imagining potential confusion when choosing a version to download, or faced with two variations of the same version, and some pointers for installation and getting started.
And, hopefully, this article will be my own little contribution to making the whole process easier for someone else to follow in the future!
Enjoy this article? — You can find similar content via the category and tag links below.
Categories — Technology
Questions or comments? — Feel free to email me using the contact form below, or reach out on Twitter.